Tag Archives: pie

Banoffee Pie

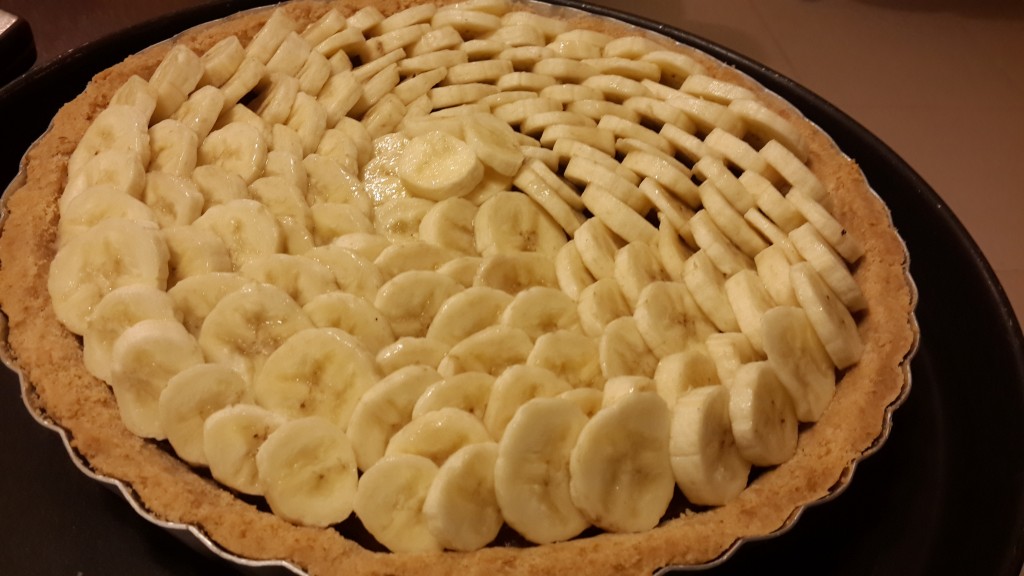
Make this one out of love for the name of the dessert, if not the banana-toffee combination 🙂


“Q. Ever wondered where the phrase “to go bananas” came from?
A. Why try when banana pancakes, choco-banana cakes, banana splits, and banoffee pies are all capable of driving you crazy?”
The Fact: Banoffee Pie was invented in 1972 at the Hungry Monk restaurant in England. It is rumored to be Mrs Thatcher’s favourite pudding.
The Inspiration: It was 10pm on the 11th of August, the eve of my birthday. As weird as it sounds, I love baking my own birthday cake, but this time, I wanted something different… “Why not some pie?”… thought I (rhyme attempt alert!).

The Ingredients

Makes 12 – 15 servings
The Base
  • 100 g melted butter
  • 250 g digestive biscuits; crushed (wrap up the biscuits in a soft cloth and beat it up any way you like; it can be a lot of fun)

The Toffee Filling

  • 100 g butter
  • 100 g Demerera sugar or any other soft brown sugar (avoid the regular white sugar because it makes the dessert too sweet)
  • 400 g condensed milk (sweetened)

The Topping

  • 6 – 8 ripe, but firm bananas (make sure that the bananas are sweet or the topping ends up being quite tasteless)
  • 250 g whipping cream

The Method

  • Take a 9-inch, loose-bottomed pie pan/tart pan and tip the crushed biscuits into it.
  • Add the melted butter to the crushed biscuits and mix well. Using the back of a spoon,  press the mixture into the bottom and up the sides of the pan, firmly, to form the pie shell. Chill in the refrigerator until the filling is ready.

Biscuit base pie crust

  • Place a frying pan or a skillet on the fire, on medium heat. Add the brown sugar to the pan. As the sugar starts to melt, add the butter.
  •  Butter and brown sugar blend
  • Stir together lightly and then leave undisturbed till the sides begin to melt. Nudge the edges from time to time, but avoid disturbing the melting process. Remember that you want the lovely burnt caramel colour and aroma; don’t worry about burning the sugar too far as long as the stove is on medium heat and not on high. The colour of the toffee depends on the colour of the caramel. 

Butter and brown sugar blend

Butter and brown sugar blend for banoffee pie

  • When the sugar has completely melted, add the condensed milk and bring the mixture to a boil on medium heat, stirring continuously. Turn off the heat as soon as the now-formed toffee takes on the right colour.

Toffee for banoffee pie

  • Pour the toffee into the biscuit base and leave undisturbed to cool. Move to the refrigerator and leave until the toffee becomes firm. This should take a few hours if the toffee has been cooled sufficiently before refrigerating.

Toffee for banoffee pie

Toffee for banoffee pie

  • After the toffee is firm, slice the bananas and place them over the toffee layer. Avoid slicing the bananas too much in advance because they’ll turn black due to oxidation, and won’t make a pretty plate.

Sliced bananas

Sliced bananas decorated for banoffee pie

  • Quickly whip up the cream and place it over the bananas. You can add your layers in any way you like it and can vary the thickness of each layer too.
  • Chill the dessert before serving it, if not, it makes the servings difficult and messy to cut through.


    Eat away. Bon appétit! 🙂

Banoffee Pie

The Perfect Pie Crust/Short-Crust Pastry

The perfect pie crust is golden brown when baked, buttery, soft and flaky, and practically melts in your mouth when you bite into it. Can you taste it already?


“Only very clever men can bite pie without breaking crust.” — Carl Sagan
The Fact:  The Ancient Egyptians around 2,500BC are known to have eaten pies made with ground oats or wheat wrapped around a filling of honey or figs.
The Inspiration: There’s something quite beautiful about making the short-crust pastry pie. It’s gorgeous to look at, beautifully simple to make, and quite an experience to eat the perfect pie. I started out quite badly but am quite proud to have mastered the art. I really hope you do too 🙂

The Ingredients

Makes 1 pie with 6 – 8 portions

For a Pie Crust WITH A COVER

  • 2½ cups (350 grams) all-purpose flour
  • 1 cup (226 g pr ½ lb) frozen or chilled butter
  • 1 teaspoon salt
  • ½ cup (120 ml) cold water
  • Optional: 2 tablespoon (30 grams) granulated white sugar (Add the sugar only when making a sweet pie/tart/quiche; not for the savoury ones).

OR

For an OPEN TOP Pie Crust

  • 1ÂĽ cup (175 g) all-purpose flour
  • ½ cup (115 g or ÂĽ lb) frozen or chilled butter
  • ½ teaspoon salt
  • ÂĽ cup (60 ml) cold water
  • Optional: 2 tablespoon (30 grams) granulated white sugar (Add the sugar only when making a sweet pie/tart/quiche; not for the savoury ones).

The Method

The secret to getting the perfect, flaky pie crust is to make sure that the butter is very cold and just out of the fridge and to try and use your fingers as little as possible to prevent your body heat from melting the butter.

Making the Pie Crust

  • Take the butter out of the fridge and quickly chop the butter into ½ inch pieces. Pop the butter cubes back into the freezer/fridge until you get the other ingredients in place.
  • Measure and whisk together the flour, sugar (optional) and salt.
  • Pop the butter cubes into the flour mixture and with a light hand, knead the butter into the flour, until the mixture resembles coarse meal. Remember not to overdo this step since the longer your fingers touch the mixture, the faster the butter melts, which is what you do not want. Alternately, you could use a food processor.

Butter and flour resembling coarsemeal

What this step does is it coats the flour molecules (or the glutenin and gliadin) with fat, preventing them from absorbing too much water in the next step. Water when in contact with wheat flour forms gluten, which makes dough elastic. But for preparations such as pies and tarts you do not want too much gluten to form because it makes the dough tough and gives it structure, which works for breads but not for soft, flaky crusts.

  • Sprinkle the cold water across the mixture and gently bring the dough together. Do not pour in the water. Stop when the dough just holds together, if pinched. If necessary, add more water. Do not knead or process more than a minute. Form a ball of the dough.

Ball of dough

  • Divide into 2 portions if making a cover for the pie, if not, leave as is. Lightly flatten each ball using your palms. To prevent the dough from sticking to your palms, sprinkle the dough with loose flour.

Flattened dough disc

  • Cover the disk (two in case of a covered pie) with plastic wrap and refrigerate for about one hour before using. If you do not cover the disk, it will harden and cracks will form, making it difficult for you to roll the pie.
  • After sufficient chilling, remove one portion of the dough from the fridge and place it on a lightly floured counter. Lightly press the heel of your palm into the dough to soften it. This also flattens the butter into the pastry layers. Leave the dough to soften a little at room temperature.
  • Sprinkle the rolling pin with some flour to prevent the dough from sticking. Using a rolling pin, roll the pastry into a 12-inch circle. As you roll, keep turning the pastry circle a little each time. This will allow you to roll out a uniform pie. Also, always roll from the centre of the pastry, outwards.

Rolled out pie

  • Gently transfer the rolled pastry circle to a 9 inch pie pan. You can do this easily by folding half of the pastry circle over the rolling pin, then moving the rolling pin to the pie pan and unfolding it. Brush off excess flour and trim the edges of the pastry to fit the pie pan. Cover with plastic wrap once more and chill in the refrigerator.
  • In the same way, roll out the second pastry disc. Cover with plastic wrap and place in the refrigerator.

Pie Crust

Blind Baking the Pie Crust

Blind baking is partially baking the pastry base before adding the filling. Although this process is completely optional, it creates a stronger crust that can hold moist filling without getting soggy. Blink baking is also done when the filling needs less time to cook than the pastry.

  • After the pie pan has chilled for about an hour or more, preheat the oven to 200ÂşC/400ÂşF.
  • Remove the pie pan from the fridge (leave the cover in) and fill it up with dried beans, dried lentils, dried rice or pie weights; something that will weigh the base down and prevent it from rising (air bubbles will leave the pie weakened). Pop it into the oven.

Half-baked pie base

  • Bake for approximately 15 minutes (for a pastry containing sugar, 10 minutes). The key is to remove the pie pan when the pie develops a light golden brown.
  • Remove from the oven and allow it to cool for about 5 minutes before you pour in the filling.

You’re done! Now pour in the filling and continue with your recipe.

Pie with a cover

Apple Pie

I believe in kicking off the winter with this crunchy-crusted, warm, moist, and totally droolable apple pie. And so should you!


“If you want to make an apple pie from scratch, you must first create the Universe.” – Eugene Field
The Fact: The term “as American as apple pie” traces back to 14th century England. The Pilgrims brought pie-making skills and apple seeds to America. As the popularity of apple pie spread, the phrase grew to symbolize American prosperity.
The Inspiration: Whether I plan it or not, winter, in my house, is born with the not-so-ceremoniously baked and eaten apple pie. It’s a thrill—the buying of the ingredients, the baking, of course, the lovely, warm apple and cinnamon smells that waft through my home. Like, I said, it almost christens the winter, my favourite season. The sequence played out this winter too, but this one was special—it was the first ever apple pie in my lovely new home. And like always, it was perfect!
  Just baked Apple Pie

The Ingredients

Serves one 9-inch pie; approximately 10 servings

Pie Crust

  • 2½ cups (350 grams) all-purpose flour
  • 2 tablespoon (30 grams) granulated white sugar
  • 1 cup (226 grams) chilled butter
  • 1 teaspoon salt
  • ÂĽ to ½ cup (60 – 120 ml) cold water

Apple Filling

  • 8 cups peeled, cored, chopped or sliced (ÂĽ inch pieces) apples; remember to use an apple variety that is crisp (not powdery) and doesn’t lose shape easily. The apples should be sweet; preferably a variety that you’ve sampled before and are familiar with.
  • ½ cup (100 grams) granulated white sugar; you can also use a combination of white and brown sugar
  • 1 tablespoon lemon juice
  • 1 – 1½ teaspoon ground cinnamon
  • ÂĽ teaspoon ground nutmeg (optional)
  • ÂĽ teaspoon salt
  • 2 tablespoons (30 grams) butter
  • 1½ tablespoons corn starch or corn flour

The Method

Making the Pie Crust

  • Chop the butter into ½ inch pieces. Try to use your fingers as little as possible to prevent the heat from melting the butter.
  • Sift together the flour, sugar, and salt. Add the butter and lightly knead together until the mixture resembles coarse meal. Remember that the more your fingers touch the mixture, the faster the butter will melt, which is what you do not want. Alternately, you could use a food processor.

What this step does is it coats the flour molecules (or the glutenin and gliadin) with fat, preventing them from absorbing too much water in the next step. Water when in contact with wheat flour forms gluten, which makes dough elastic. But for preparations such as pies and tarts you do not want too much gluten to form because it makes the dough tough and gives it structure, which works for breads but not for soft, flaky crusts.

  • Sprinkle the cold water across the mixture and gently bring the dough together. Do not pour in the water. Stop when the dough just holds together when pinched. If necessary, add more water. Do not knead or process more than a minute.
  • Form a ball of the dough and divide into 2 portions. Lightly flatten each ball using your palms. To prevent the dough from sticking to your palms, sprinkle the dough with loose flour.
  • Cover each disk with plastic wrap and refrigerate for about one hour before using. If you do not cover the disk, it will harden and cracks will form, making it difficult for you to roll the pie.
  • After sufficient chilling, remove one portion of the dough from the fridge and place it on a lightly floured counter. Using a rolling pin, roll the pastry into a 12-inch circle. Remember to sprinkle the rolling pin and counter with loose flour to prevent the dough from sticking. As you roll, keep turning the pastry circle a little each time. This will allow you to roll out a uniform pie. Also, always roll from the centre of the pastry, outwards.
  • Gently transfer the rolled pastry circle to a 9 inch pie pan. You can do this easily by folding half of the pastry circle over the rolling pin and then moving the rolling pin to the pie pan and unfolding it. Brush off excess flour and trim the edges of the pastry to fit the pie pan. Cover with plastic wrap once more and chill in the refrigerator.
  • In the same way, roll out the second pastry disc. Cover with plastic wrap and place in the refrigerator.

Making the Apple Filling

  • In a large bowl combine the sliced or chopped apples, sugar, lemon juice, ground cinnamon, nutmeg, and salt. Gently toss the mixture so that all the apple pieces are lightly coated with the other ingredients.
  • Allow the mixture sit at room temperature for about 30 minutes or more to allow the juices to seep out. Now, place the mixture in a strainer and collect the juices separately. Allow the juices to drain for 30 minutes or until you have about 1/2 cup of juice.
  • Lightly boil and caramelize the collected juices with 2 tablespoons of butter in a saucepan. Heat for about 5 minutes or until the liquid has formed a lovely caramelized syrup and has reduced to about 1/3 cup. You can also use a microwave to form the syrup.

Putting together the Apple Pie

  • Remove the pastry crust (the one in the pie pan) from the refrigerator and allow it to soften at room temperature for about 15 minutes.
  • Transfer the drained apples slices from the strainer to a large bowl. Sprinkle the mixture with corn flour. Now, pour the syrup over the apples and toss the mixture to coat the apple pieces.
  • Transfer the apple mixture into the chilled pie crust, evenly.
  • Moisten the edges of the pie shell with a little water and then place the top crust over the apples. Gently press the edges together.
  • Tuck any excess pastry under the bottom crust and then crumple the edges using your fingers.
  • Using a sharp knife, make five- 2-inch slits from the centre of the pie outwards. This will allow steam to escape.
  • Cover the pie with plastic wrap and chill in the refrigerator while you preheat the oven.

Pre-baked Apple Pie

Baking the Pie

  • Preheat the oven to 425°F (220°C).
  • Cover the edges of the pie with a foil ring to prevent it from burning after about 30 minutes.
  • Place the oven rack at the lowest level. You could also place a baking sheet on the rack before preheating the oven to catch any apple juices. Note that if your oven tends to overheat, use a baking stone and raise the pie pan to prevent the bottom from burning.
  • Place the pie on the rack and bake for about 50 to 55 minutes.
  • Pull the pie out when juices start to bubble through the slits and the apples feel tender (not mushy) when a toothpick is inserted through one of the slits.

Just baked Apple Pie

Serving the Pie Remove the pie from the oven and place on a wire rack to cool for about 3-4 hours before cutting. Serve warm or at room temperature. It’s practically impossible to wait, but trust me, resist it; it’s totally worth it. The wait allows all the juices to seep pack into the filling, thus making for a divine, moist apple pie, with a crisp pie crust. You can store the pie at room temperature for 2 to 3 days. It might not survive, but if it does, refrigerate after Day 3. Have the pie for dessert, at tea time or just about every time you walk by the kitchen. You can serve it with vanilla ice cream or whipped cream, but the original, plain pie, is the best, in my opinion. Bon appétit!

A slice of Apple Pie